
 06-12-2012, 12:56 AM
|
المشاركة رقم: 1 | ||||||||||||||||
|
المنتدى :
منتدى اجهزة الكشف عن الكنوز والمعادن وانواعها ومواصفاتها
On getting my GoldMaxx Power I realised I was way out of my depth, so I have searched the web and asked for advice where I could. You will find below settings for most situations, these are tried and tested, the settings come from forum members, websites and some of my own, they are here to help people get started and to lessen the learning curve. That said please experiment and if you find somthing that works better or you discover a good tweak let me know and I'll add it to the guide. 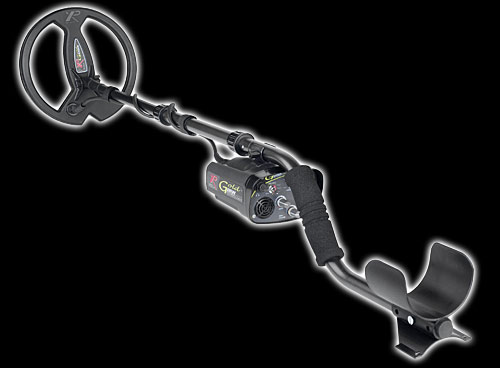 XP GoldMaxx Power Manual Purchased your GoldMaxx Power second hand and did not get a manual? Click below. http://www.xpmetaldetectors.com/docs/go ... nglish.pdf Please Note The following settings are at the machines default setting of 3 tone  Starting Out - General Use Firstly hold your machine up in the air ensuring there are no overhead electric cables or metal objects near by, it will beep twice and then moments later a final third beep. Your machine is now ready to go. Option 1 Silencer 1 Ground Accept/Reject 12 oclock Iron Volume 11 oclock Sensitivity 12 oclock Iron Threshold 15 Ignore the low buzz its iron, Dig the hi tones. Option 2 Silencer 1 Ground Accept/Reject 11 oclock Iron Volume 11 oclock Sensitivity between 11 & 1 oclock Iron Threshold 15 If there is a lot of coke in the ground run Iron Threshold in auto. Option 3 Silencer: 1 (but 0 if you're needing super fast recovery- 2 if you're on quiet ground and want that extra depth). Ground: Accept/Reject 11 or 12 ‘o clock Iron Volume: 10 ‘o clock Sensitivity: 12 ‘o clock Iron Threshold: 12 ‘o clock. Option 4 Silencer 2 Ground Accept/Reject 1 oclock Iron Volume 7 oclock Sensitivity Off and follow below instructions Iron Threshold 8 Hold the machine at waist level turn senssitivity fully clockwise, listen to the chirping sounds,now turn sens anti-clockwise slowly until the chirping stops. Slowley lower the coil to the ground, congratulations your machine is now air & ground balanced. Iron will spit or give out a low growl or both, deep large iron will be loud and then silent buckles / buttons / copper coins will be medium sound silver / gold / hammereds will give out high pitch sound. Machine is in all metal mode with 3 tone sounds to distinguish what to dig or not to dig, this increases the depth and sensitivity to hammereds. The Beach Dry Sand Silencer 2 Ground Accept/Reject 3 oclock Iron Volume 12 oclock Sensitivity 10 oclock Iron Threshold Just Off Auto Wet Sand Option 1 Silencer 0 (this is important I'll explain why at end) Ground Accept/Reject 10 o'clock Iron Volume 12 o'clock Sensitivity just past the POWER ON position Iron Threshold set to Auto In this setting the detector will make a low buzzing sound as you swing, so left to right you will get a continuous buzzzzzzzzzzzzzzzz for the duration of the swing, this is why you need Silencer to 0 so you get that important recovery speed. As on land you will get broken signals this is your crap stuff like iron nails, the sweet high sounds will come through loud and clear, again as on land. The buzz sound as you sweep is low enough not to annoy and you tend to forget it, also it helps the sweet tones as they are more identifiable as when they sound the buzz disappears. Option 2 Silencer at user discression (see note at end) Ground Accept/Reject 2 oclock Iron Volume 11 oclock Sensitivity 11 oclock Iron Threshold Auto With the silencer you will have to adjust depending on how much irons around, remember 0 has the fastest recovery speed while 1 & 2 give better tonal separation for target ID,unfortunately there is always going to be a trade off between fast recovery and target ID. The Stubble Option 1 Silencer 2 Ground Accept/Reject 11 oclock Iron Volume 11 oclock Sensitivity between 1 & 2 oclock Iron Threshold 11 Swing above the stubble, if you catch the coil on the stubble it will give a false read, you will get used to what the false read sounds like within a few minutes. Option 2 Silencer 2 Ground Accept/Reject 12 Iron Volume 10 Sensitivity 1 oclock Iron Threshold Auto The Pasture Silencer 1, but if you are on quiet ground select 2. Ground Accept/Reject between 11 & 12 oclock Iron Volume 10 oclock Sensitivity 12 oclock Iron Threshold 12 oclock The Trashy Site Silencer 1 Ground Accept/Reject Slightly right from the preset mark Iron Volume Off Sensitivity 12 oclock Iron Threshold Auto Hints & Tips Try using the iron volume at 10 o clock it will let you know where potential hot spots are. In this setting the GMP will give a very distinctive low buzz. Try using the silencer switch at the 2 position it will give a clearer audio and slightly more depth. Remember to be cautious when using to much power, this is the 3 o clock position and beyond as this tends to degrade audio, tests indicate that the sensitivity is best suited around 12 or 1 o clock for the standard coil. Tips & Hints on Goldmaxx Power From The Norfolk Wolf Firstly, let me congratulate you on choosing the Goldmaxx Power, you have joined the ever-growing band of XP detector users. I detect and field test machines full-time and being independent I owe my allegiance to no manufacturer, but after testing the XP range they made such an impression, that I now use them myself. John Lynn (Norfolk Wolf) You will be able to go out with the Goldmaxx Power and start finding straight away, these tips and hints are for you to understand the detector better and so will increase those finds. So let’s take a closer look at the controls individually then as a whole. The first thing to stress is that ALL the controls work in conjunction with each other, by changing a setting on one will have an impact on another and this will have a bearing on the overall effectiveness of the detector’s performance. Iron Threshold. What does it mean and what does it actually do and why the Auto position. Think of this as two discrimination systems, The Auto has been set at such a position as to ignore metals that have a conductivity up to and including that of “coke” (unburnt coal),as this had proved to be a problem for some people in the past when using the previous Goldmaxx. However for those who don’t encounter this problem, by switching out of auto the discrimination starts working from giving no signal on tiny pieces of iron right through to the larger sizes and shapes of it. Unlike other detectors, the cut-off for discrimination at maximum is no higher than large iron. We all dig any signal other than iron anyway, so why have it higher? Another factor that comes into the equation is the lower the discrimination, the faster the recovery speed**. If you were to turn the Iron Threshold up to maximum and use it at that setting all the time in the thinking, ”right I don’t want to be bothered by that useless stuff”, you would be wrong. The reason being, that by doing this you could mask out a good signal that is close by to a small nail. Set the Iron threshold to size of the iron that you are encountering under the coil, so if it is just small nails, use it at a low setting. Larger iron? Then increase the setting, remember “the lower the practical setting, the better”. Recovery speed? This is the time it takes a detector to recover from one metal object’s signal to give a positive response to the next. To explain this a bit more fully. When going over an unwanted object (iron nail etc) the quicker the detector recovers from this signal the less distance is needed to find the next signal so this gives you more chance of finding a good one (coin) near to it. In owning the Goldmaxx Power you have the detector with the fastest recovery (by far) that I have ever tested. Silencer Regard this as an incremental discrimination system when on the lowest settings of the iron threshold (not auto) for tiny iron, nails etc (Nail Reject). Position 0 will have a small amount of discrimination, small nails will “spit” or give a broken signal. This position will have the best recovery speed. So why not stay on 0 all the time? Well, as I said, 0 partially discriminates against small nails. By changing to 1 helps to discriminate against the small iron a little more with less sound breaking through, then obviously 2 goes even further to discriminate the small nail even more, so there will be no sound. Hence the name, Silencer. Obviously with the high level of Disc. in Auto you won’t be aware of it’s discrimination effects, the same applies on the higher levels when out of Auto; but in both instances the recovery speed is increased when in “1” and even more so when in”0”. However if the area you are working doesn’t contain a large proliferation of iron and therefore no need to have a fast recovery speed, use the “2” setting as this will improve the separation between the tones. The other use of the silencer is that by flicking from “1” to “2” twice within a couple of seconds, the tones will change from the default setting of three to two. However be aware that when employing two tones and you come out of Auto Iron Threshold this then becomes a single tone. I don’t recommend this practice when you are first learning the machine. To return to three tones the detector needs to be switched off then on again. Iron volume This control gives what I can only describe as a low buzz to iron (and coke when in Auto); the higher it is turned, the louder the volume and the better it works on the bigger stuff such as horseshoes etc. Why do we need it? Well think about it for a minute, if everything was quiet as you were detecting, how would you know what is under the coil? Because the iron volume will be “buzzing out” on iron and coke, this will enable you to sweep the coil at the correct speed thereby allowing the recovery speed of the Power to work at it’s most efficient. “Iffy signals”? Correct use of the Iron volume will cut these to a minimum. One very important tip. The front edge of the coil isn’t as sensitive as the rest of it, use the front edge over non-definite signals, this will increase the effectiveness of the iron volume. Try running a large nail or bit of iron over the centre of the coil and then over the leading edge; you will see how much more that this improves the “buzz”. What you can also try out at home with the larger pieces of iron, is to run it across the coil with the iron volume off; it will give a low note, now gradually move it further away, the note changes to a higher pitch whilst still remaining loud. The further away from the coil, the more it begins sounding like a coin. Turn on the iron volume, this will “growl” over iron, the larger and also the deeper the iron, the more the control needs to be turned to the right. Even so, some large pieces will still come through when beyond the depth of the Iron Volume. This will be all part of the learning curve, the larger pieces will give a louder than normal signal and a mixture of tones, which to begin with can be confusing. Any signals you receive like this you will soon learn to leave them. If you do decide to dig them take out the first shove-full of soil and then turn the Iron volume on full and run the coil over and in the hole, if it is deep large iron it will then give the “buzz”. Keep it slow to let you know! At home try testing the silencer in conjunction with the iron threshold just out of Auto by using different sizes of old rusty nails and bits of iron. Listen to the responses from the different shapes and sizes. Now increase the iron threshold settings further and further to the right. Finally try it in auto. Depending on the size and depth, as the search head travels across larger and larger nails or pieces of iron, these will give a broken signal, and eventually come through the discrimination and sound out. The larger the size of iron the further away to one side the coil will need to be from it, to pick up a good target. This is called Target Masking. This just means the effect that discriminated iron has near a good target; (a coin) this prevents the good target from registering. When detecting and your getting a few iron signals, it’s a good idea to “see in your minds eye” the iron you’ve just gone over, assess the size by the type of signal; then remember about the iron masking the signal and the detector needing more time to recover. The way to help the detector work to the best of its ability is to sweep slowly in these “naily” areas, give the machine time to recover from a bad signal. Most people regard nails and iron as a nuisance, and can’t wait to get out of the area and speed up. As you have just read, this is exactly the opposite of what is required. Iron and nails are a likely sign of habitation, which means finds. Regard them not as a nuisance but more as a problem, which now you can overcome. N.B. For best results in “naily areas” reduce sensitivity back to “10o’clock” (even further if necessary) and work slowly, depth does not come into the equation in areas such as these. By doing this, it will actually “help” the detector. The worse the situation, the less the need of sensitivity. At home run a coin over the coil at the preset sensitivity mark, notice the depth. In stages reduce sensitivity and check the loss of depth, until finally it is on the lowest sensitivity possible. Surprising isn’t it? This will give you the confidence for naily areas. Practice with it at home. Ground Reject As there is no threshold, the ground balance system on the Goldmaxx is different than that of other detectors. Instead of “balancing” the ground, it employs a system that rejects it. What does it really mean and why do we need it? The ground (soil) contains varying amounts of negative iron oxides, and it’s a means of rejecting these mineral signals in the ground so that they won’t affect the detectors ability to find metallic objects. If we start where the ground reject is set correctly, any movement of the control will be either to the left, (picking up the ground minerals) or right, (moving further away from the effects of the ground minerals.) But the detector has already been ground balanced when I switched it on and held it in the air for five or more seconds? That’s not quite right, not to go into too great depth, it is measuring the resistive and inductive components of the coil and generally “setting up the detector”. Ground Reject allows the more advanced user to “fine tune” the detector for his particular piece of ground. For the first few weeks set the control on the preset mark as this will also knock out troublesome hot rocks**, the detector will be more stable and also giving better discrimination. This will be of real help, for you to begin understanding the detector and how it works. Do not be in a rush to go beyond this stage. Understanding is everything, this machine has the capabilities to put a great deal of finds in your pocket, you will be the one to stop that happening, not the machine. Eventually as you progress, you will want to try the Ground Reject. As a general rule have it set to where the red segment first begins on the control, (about 11o’clock), too far left for the ground conditions and the detector becomes unstable, false signals occurring (chattering), discrimination will be effected, , and target separation disintegrates (Frightening). Considering that this detector is deep to begin with, the quest for that little bit more depth has too much against it, ** Hot rocks what are they? It’s normally a small rock that is different in its mineralisation than that of the surrounding ground. These can cause the detector to sound off. To reject these is straightforward enough. Obtain the hot rock when detecting, run the hot rock backwards and forwards over the coil whilst turning the Ground reject slowly to the right, until the signal disappears. That’s it! These are not to be confused with “coke”, hot rocks are mineralised= ground reject, “coke” is conductive= Auto Iron threshold. N.B. If you are using the ground balance on the preset mark and the detector starts giving false signals or behaving a bit more erratic from the norm, check that you haven’t moved the ground balance, if not, then reduce the sensitivity, you’re either over a lot of iron or ashes! (Other situations are given in the back of the manual.) Sensitivity. Be very cautious with this control, the added power can catch out the unwary, instead of the expected increase in depth; too much use of this control will actually diminish it!! I would suggest that for the first few weeks until you are really familiar with the Power that you only have the Sensitivity set at about 12-1o’clock. Any higher over certain ground conditions and you will be giving yourself a lot of head-aches in trying to understand the machine. Even at this setting you will find that there is about the same amount of depth capabilities as the old Goldmaxx on preset. (Try it out at home with a hammered coin at preset then gradually turn the sensitivity back to just on). As I said earlier with settings for the ground reject, don’t be in a rush to go beyond this stage. However when you become more accustomed to the detector you will eventually want to go beyond the last statement. To get the best out of the detector it first needs to be set to the ground conditions before attempting to increase the sensitivity. One more point, do not be afraid to use lower settings than those I recommend especially over “naily” or bad ground. On certain sites of mine I have had the sensitivity only barely switched on as this was the only way that I could find the good items from amongst the nails. Having the sensitivity any higher defeated the object; I was actually getting less depth and more of ear-bashing from unwanted signals that masked the good ones. Frequency and channel shift. I don’t think there is anything I can add as this has been covered quite adequately in the manual, Enjoy using your new Goldmaxx Power; I am convinced that after awhile when you become accustomed to it your finds rate will be higher, mine certainly are. Good hunting for the future. John. John Lynn Norfolk Wolf |
||||||||||||||||

|

|
||||||||||||||||
 |
| مواقع النشر (المفضلة) |
| الذين يشاهدون محتوى الموضوع الآن : 1 ( الأعضاء 0 والزوار 1) | |
| أدوات الموضوع | |
|
|
 المواضيع المتشابهه
|
||||
| الموضوع | كاتب الموضوع | المنتدى | مشاركات | آخر مشاركة |
| ارجو الحل الى الخبراء ثور نفر ؟ | العقرب | الحوار والاسئلة الخاصة باشارات الحيوانات | 49 | 22-11-2016 10:20 AM |
| عملة فخار | محمد العظامات | التحف | 5 | 26-04-2013 08:06 AM |
| أخي الساجد ولأخوة الخبراء ارجو الافادة حول جهاز Pulse Master Pro البلغاري | أبو عبدالرحمن | الاستفسارات عن الاجهزه | 7 | 17-11-2012 01:45 AM |
| ارجو المساعده من الخبراء | المحقق كونان | تحليل رموز الدفائن وفك الشفرات | 9 | 25-10-2011 11:28 PM |
| اي جهاز ينصحني به الخبراء | حذيفة | منتدى اجهزة الكشف عن الكنوز والمعادن وانواعها ومواصفاتها | 14 | 23-10-2011 02:59 PM |


